Tuesday, October 9, 2012

Long and Short Satin Stitch

Long and Short Satin Stitch consists of a first row of long and short vertical stitches followed by rows of long stitches. By subtle changes of color on each row, soft shading effects can be achieved.

Step 1. Come up at A, go down at B, up at C, and down at D. Continue alternating long and short stitches across row from left to right. Secure thread.
Step 2. Repeat above step, this time working long stitches only across row to fill motif. The last row will require some short stitches.

Flat Stitch

Similar to Fishbone Stitch, here slightly slanted stitches cross to form a wide central wedge. Draw guidelines before you begin.
Step 1. Come up at A, go down at B and come up at C, working accurately to guidelines as shown.


Step 2. Cross over stitch A-B and go down at D. Pull thread through. Let the motif shape determine slant of stitches.


Step 3. Come up at E, just above A, following outline of motif. Pull thread through, ready for next stitch.


Step 4. Cross over and go down at F. You can pack stitches tightly or allow fabric to show, depending on desired effect.


Step 5. Continue in this way until outline is completely filled, to create dense texture, pack stitches tightly together.


Chequered Chain Stitch

Chequered Chain Stitch is also known as Magic Chain or Magic Stitch. A bi-colored effect is achieved by using two contrasting thread colors. Alternate the colors by alternating the working thread for each chain loop as shown.

Step 1. Come up at A with both threads, make loop, go down next to A, and come up at B over one thread. Pull both threads thrown to form loop with first color.

Step 2. Make loop and go down next to B. Come up at C, keeping needle over second thread. Pull through to form loop with second color. Repeat from Step 1.


Pekinese Stitch

Pekinese Stitch is also known as Chinese Stitch or Blind Stitch or Forbidden Stitch. This composite line stitch is popularly used as a border, particularly for lacy edgings on collars and cuffs.

Step 1. Work a foundation row of backstitch following guideline or outline of motif. Tie thread at back of fabric.


Step 2. Whip contrasting thread in circular motion, looping in and out of backstitches, keeping loops even.


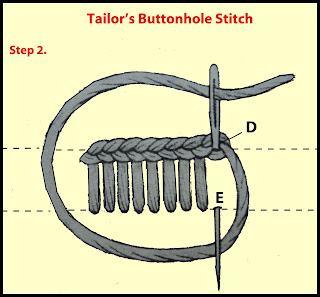
Tailor's Buttonhole Stitch

Tailor's Buttonhole Stitch is durable version of buttonhole stitch features a knotted edge. Useful for heavy weight fabrics. Place stitches close together and work from left to right.

Step 1. Come up at A. With needle over working thread, go down at B and come up directly below at C. Pull thread to form knot at top.


Step 2. Go down through knot at D and come up at E over working thread. Pull to form another knot and continue.


Chequered Chain Band

Chequered Chain Band is worked downwards to create a band. Use as a border, or place bands of stitches side by side as a filling stitch. Create the bi-color effect by using two needles threaded in different colors and worked alternately down the band.

Step 1. Work column of horizontal straight stitches as shown. Tie off. Then thread two needles with doubled length of thread in each, one light, one dark.


Step 2. Bring dark thread out at A; bring out light thread under horizontal stitch and between two dark strands. Carry dark thread to left, under light thread.

Step 3. Insert needle with dark thread under second horizontal stitch as shown, and then carry it under dark thread but over light thread.

Step 4. Pull needle through. The band should now look like this. As you work, always keep dark thread to left and light thread to right.

Step 5. Repeat Step 3. and 4., this time inserting needle with light thread under horizontal stitch and dark thread. Continue, alternating two needles.

Threaded Herringbone Stitch

Threaded Herringbone Stitch is made up of a row of herringbone stitches laced with one or two contrasting intertwining threads.

Step 1. Work a row of herringbone stitch from left to right. Tie off. Using contrasting thread, come up at A.

Step 2. Working from left to right, lace thread under and over row of herringbone stitches as shown.

Interlaced Band

Interlaced Band is also known as Herringbone Ladder Filling Stitch or Double Pekinese Stitch or Laced Cretan Stitch. This lacy border and filling stitch is worked on a foundation of two parallel alternating rows of backstitch. Draw guidelines on the fabric before beginning.

Step 1. Work a row of backstitch. Then work parallel row of backstitches, positioning stitches opposite to stitch breaks in a first row as shown.

Step 2. Using contrasting thread, come up at A. Lace right to left through top right-hand stitch, keeping working thread under needle. Repeat to left as shown.

Raised Chain Band

This composite stitch is made up of horizontal straight stitches linked with chain stitches worked with a contrasting thread. Begin by making a vertical column of horizontal straight stitches.

Step 1. With contrasting thread, come up at A, take thread over horizontal stitch; come up to left of A. Slide needle under stitch with thread under needle point.

Step 2. Pull thread through. Take thread over and under next horizontal stitch and slide needle under stitch to the left as shown. Pull thread through. Repeat.
 

Tied Herringbone Stitch

Tied Herringbone Stitch is also known as Coral Knotted Herringbone Stitch. This simple border and filling stitch is made with herringbone and coral stitches. When used as a filling, place foundation stitches directly above each other so the tips touch.

Step 1. Work a foundation row of herringbone stitches. Keep stitches of same length and evenly spaced.

Step 2. With contrasting thread, work coral stitches over herringbone stitches, making knot at each intersection.

Guilloche Stitch

The name derives from a term used in architecture for an ornamental border containing two or more interwoven wavy lines. Used to create a decorative band, Guilloche stitch can include several different thread types.
Step 1. Work two parallel lines of stem stitch, keeping stitching even. You may want to use guidelines.

Step 2. Between lines, work evenly spaced vertical bands, each consisting of three satin stitches.

Step 3. Starting at the left, lace contrasting thread through first band and then through second, picking up background fabric. Continue across row.

Step 4. Repeat in opposite direction, taking care not to split existing threads. If you wish, choose contrasting thread to add interest to the design.

Step 5.  Work a French Knot at the center of each circle formed by the lacing as shown, using a new thread color id desired.

Threaded Detached Chain Stitch

Threaded Detached Chain Stitch is made with a row of detached chain stitches spaced evenly apart, then laced with contrasting threads.

Step 1. Working from right to left, work a row of evenly spaced detached chain stitches as shown.

Step 2. With contrasting thread, weave up and down through main body of each chain. Repeat in opposite direction.

Applying Mirror on a Fabric


Use this stitch to attach any round or oval object, such as coins, mirrors, etc.

Step 1. Working over the mirror, come up at A, go down at B, up at C, across and down at D, up at E, down at F, and up at G.


Step 2. Pass needle under thread A-B and go down at H to form a diamond-shaped grid, coming up at I.


Step 3. Go down at J, come up at K, down at L, up at M, down at N, and up at O. Pass needle under parallel vertical threads and go down at P. Fasten off.

Step 4. Come up at Q, take needle under and back over intersection of vertical and diagonal stitches. Go down at R, up at S with thread under needle point. Pull through.

Step 5. Repeat Step 4. weaving over and under crossed threads until edge of mirror is securely held.

Beadwork stitches


Attach your beads individually, or use a couching technique to stitch on rows of beads at a time. The mirror technique can be used to secure any flat, round, or oval object.

Sewing on beads
There are two main methods of applying beads. Stitch them onto the fabric individually (top) or, if using a pre-threaded row (bottom), use a couching technique.

1. Sewing single bead
Come up through the fabric and bead. Then go down through fabric, come up and place next bead on needle. Repeat, making small backstitch every 4-5 stitches for security. Stitching each bead twice also holds bead firmly.

2.Couching Beads
Come up through fabric. Pick up a row of beads, go down at end of row and anchor thread. Come up at A, cross thread between first two beads and go down at B. Repeat along row to secure beads, couching between every third or fourth bead.


Threaded Backstitch


Useful for outlining, this stitch can be worked in one, two or three colors. Sizes the backstitches according to the weight of thread to be whipped or laced through row.

Step 1. Work row of backstitch, making stitches slightly longer. Use Contrasting thread to weave in and out.

Step 2. For double threaded backstitch, weave as before in opposite direction. Be careful not to split threads, already worked.

Wave stitch


This versatile line and filling stitch can produce different effects according to the length and positions you choose for the base row of stitches.

Step  1. Work a row of vertical straight stitches. Fasten off. Bring a new thread up at A and slide under first stitch. Go down at B; come up at C. Repeat along row.


Step 2.  As a filling stitch; come up at K; slide thread through base of H and I; go down at I, up at M; repeat. Pierce fabric only at base of row being worked.