Tuesday, October 9, 2012

Rosette Chain Stitch

Rosette Chain Stitch is also known as Bead Edging Stitch. Useful for bordering delicate work, this twisted chain resembles braid. When worked in cotton perle, it creates a raised effect. Work from right to left.

Step 1. Come up at A. Make loop and go down at B. Come up at C through loop, and pull through. Slide needle under stitch close to A as shown. Pull through.

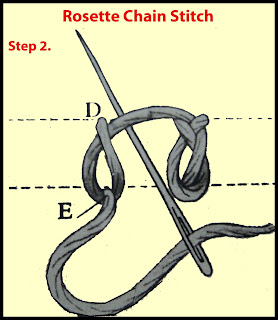
Step 2. Make loop and go down at D. Come up at E through loop; slide needle under slack thread close to D. Pull to form second knot. Repeat Step 2. as desired.

Monday, October 8, 2012

Plaited Braid Stitch

Plaited Braid Stitch requires practice but is very effective as a decorative border. Work from the top down and use a heavy thread. Pinning the loops will help you practice.

Step 1. Come up at A and make a loop with working thread, placing loop to the right of A as shown.

Step 2. Insert needle through loop at B, coming up at C with working thread under needle point.

Step 3. Pull through, holding left-hand loop ready with thumb. Carry thread to and slide needle right to left as shown. Do not pick up background fabric.

Step 4. Go down at D (within bottom right-hand loop); come up at E (within bottom left-hand loop). Keep working thread under needle.

Step 5. Repeat Step 3. and 4. and keeping thread under needle point. Try to make loops even to achieve a next column of stitches.

Braid Stitch

Braid Stitch is also known as Gordian Knot Stitch. This textured border stitch works well on curves and with a heavy thread such as cotton perle. Work from right to left and make sure that you form the loops properly as shown, with the left side of the loop laid over the right side.

Step 1. Come up at A. Make loop on fabric as shown, then go down at B through center of loop. Come up at C, with thread under needle point.

Step 2. Pull thread through. Then loop thread as in Step 1. go down at D and come up at E as shown to complete second stitch. Repeat to continue along row.


Wheatear Stitch

When worked in small columns, this line stitch looks like a stalk of grain. Usually worked in straight rows, this stitch can also follow gentle curves.

Step 1. Come up at A, go down at B, up at C, down at B again, up at D. Without picking up fabric, slide needle right to left through bottom of the V just made.


Step 2. Go down at D and then come up at E, ready for next stitch. Repeat from Step 1. to continue working columns of stitches as desired.

Sunday, October 7, 2012

Double Feather Stitch

Double Feather Stitch is also known as Double Coral Stitch or Thorn and Briar Stitch. This variation on basic feather stitch is used to create a zigzag of feathery branches. A useful border stitch, it is worked from top to bottom.

Step 1. Come up at A, down at B, up at C, keeping needle over stitch just made. Repeat, following letter sequence. Then cross to left; go down at H and up at I.

Step 2. Repeat, going down at J, up at K, down at L, up at M, down at N, up at O. Continue, working two stitches to left and two to right, keeping loops even.

Closed Feather Stitch

Closed Feather Stitch is worked from top to bottom and creates a wide feathery border. Draw parallel guidelines on your fabric before beginning.

Step 1. Come up at A, go down at B and up at C, keeping working thread under needle. Pull thread through.
Step 2. Take thread to left; go down at D and up at E. Alternate sides to continue, keeping working thread under needle.

Cretan Stitch

Cretan Stitch is also known as Persian Stitch or Quill Stitch or Long-armed Feather Stitch. This stitch is particularly useful for filling shapes and creating lines. Work from alternate sides of the shape to fill it. Draw guidelines on your fabric before beginning.

Step 1. Come up at A, go down at B and up at C, keeping working thread under needle point.

Step 2. Go down at D, following motif outline, come up at E, keeping working thread under needle.

Step 3. Go down a short distance at F, coming up at G with thread under needle point as shown.

Step 4. Go down at H and then come up at I, again keeping thread under needle point as shown.

Step 5. Continue in this way. Vary size of stitch by extending or shortening the central crossover.